How to Configure User ID Tracking in Google Analytics 4 for Stripe Events
-
Sep 07, 2025
Integrating Stripe transactions with Google Analytics 4 (GA4) through Paytics provides valuable insights into your customers' journey. By setting up User ID tracking, you can link Stripe events to individual user behavior in GA4, providing a comprehensive view of user engagement and conversions. This guide is based on the official google guide.
Why Implement User ID Tracking?
User ID tracking allows GA4 to recognize and consolidate user interactions across different devices and sessions. When a user logs in or identifies themselves on your website, you can assign them a unique User ID. By passing this User ID along with your Stripe events, GA4 can link purchase data with the user's browsing behavior, giving you a complete picture of their journey.
Important Limitations for User IDs in Google Analytics
When setting up User ID tracking in Google Analytics, it's crucial to follow Google's Terms of Service, which prohibit the collection of Personally Identifiable Information (PII). This means that sensitive data such as email addresses, social security numbers, or any other personal information as User IDs cannot be used as User IDs within Google Analytics.
Even if your internal systems use email addresses or other PII to identify users, you must not send this data to Google Analytics. Instead, use anonymized identifiers that uniquely represent a user without revealing personal details. For example:
- Not Allowed as User ID: jane.doe@mywebsite.com (contains PII)
- Allowed as User ID: 5239asbd923fade923da (an anonymized identifier)
You may wonder if using such anonymized IDs is still a concern given that you can match them to individuals within your own system. According to Google's policies, as long as the IDs do not contain PII and are not easily decipherable by unauthorized parties, they are acceptable. This approach aligns with industry standards and privacy regulations, ensuring both data security and user privacy.
Other GA4 Limitations
- Historical Data Limitations: User IDs are not applied retroactively. GA4 will not automatically link past anonymous sessions to a new User ID when a user registers or logs in during a future session.
- Session Application: Once a user logs in during a session, the User ID will be applied to all subsequent events in that session, including those that occurred before the login.
- User ID Length Restriction: The User ID must be no longer than 256 Unicode characters.
- Consistency Across Properties: User IDs cannot be merged across different GA4 properties. To track a user's journey across multiple platforms, use the same GA4 property.
- Include User ID with Every Event: Always send the user_id parameter with every event when available. Ensure the user_id field is included in your GA4 configuration tag, and that all event tags reference this configuration.
- Avoid High Cardinality Issues: Do not register User ID as a custom dimension (e.g., crm_id) to view it directly in reports. This can cause high cardinality, leading to data sampling and reduced report accuracy.
How Paytics Handles User ID?
By default, Paytics uses the Stripe Customer ID as the User ID when sending events to Google Analytics 4 (GA4). This means that when a customer completes a purchase via Stripe, their unique Stripe Customer ID is sent to GA4 interactions, enabling you to track user behaviour across sessions and devices.
However, Paytics offers the flexibility to customize this approach. If you prefer to use a different identifier, such as your own internal User ID, you can adjust your Paytics settings accordingly. For detailed instructions, refer to our guide on customizing User ID tracking .
Step-by-Step Guide to Configuring User ID Tracking
Prerequisites
- Access to your Google Analytics 4 property.
- Paytics app connected to your Stripe and Google Analytics accounts.
- Ability to modify your website code to include User ID.
1. Enable User ID Tracking in Google Analytics 4
- Log in to your GA4 property at analytics.google.com.
- Click on the Admin gear icon in the lower-left corner.
- Under the Property column, select Data Settings and then click on Data Collection.
- Ensure that User ID tracking is enabled. If not, toggle the switch to turn it on.
2. How to send a User ID to Google Analytics
There are several methods of sending the User ID to Google Analytics. Below is the recommended method, but feel free to implement another method as long as it ensures the correct sending of the User ID to GA4.
2.1 Push the User ID to the Data Layer
If your website includes a user authentication system (login feature), one of the most reliable ways to capture the User ID is by pushing it directly to the Data Layer. Assuming that if a user has an account, they already have a Stripe Customer Id, you can use the following code snippet to send the user ID to Google Analytics. Make sure to replace 'STRIPE_CUSTOMER_ID' with the actual dynamic value for the logged-in user’s Stripe Customer ID. This will ensure that the User ID is captured accurately for GA4.:
window.dataLayer = window.dataLayer || [];
window.dataLayer.push({
  'userId': 'STRIPE_CUSTOMER_ID' // Replace 'STRIPE_CUSTOMER_ID' with the customer's ID in Stripe
});
Thismethod is more reliable than other alternatives because it directly adds the User ID directly to the Data Layer, making it easy for Google Tag Manager (GTM) to access and send the data to Google Analytics..
Code Placement:
- Traditional Websites (Full Page Refresh): Place this code above the GTM container snippet in your website's source code. This ensures the User ID is ready when GTM starts, allowing you to track user activity on every page with triggers like "All Pages."
- Single Page Applications (SPAs): In SPAs, you can place the code whenever a user logs in or when needed. The ‘event’ part is optional but can be useful for tracking specific actions like login events in GTM.
Important: Always make sure the developer adds the User ID to the Data Layer every time a new page loads, especially if the page refreshes. This keeps tracking accurate as it ensures new data is pushed into the Data Layer.
3. Insert the User ID Variable in Google Tag Manager
To track User ID in Google Analytics 4, you need to send the user_id with every event (when the user is logged in). To ensure that the setup works correctly, you'll implement this in two places:
3.1 Add User ID to the GA4 Configuration Tag
- Open your Google Tag Manager workspace.
-
On the lefthand side, click Variables.
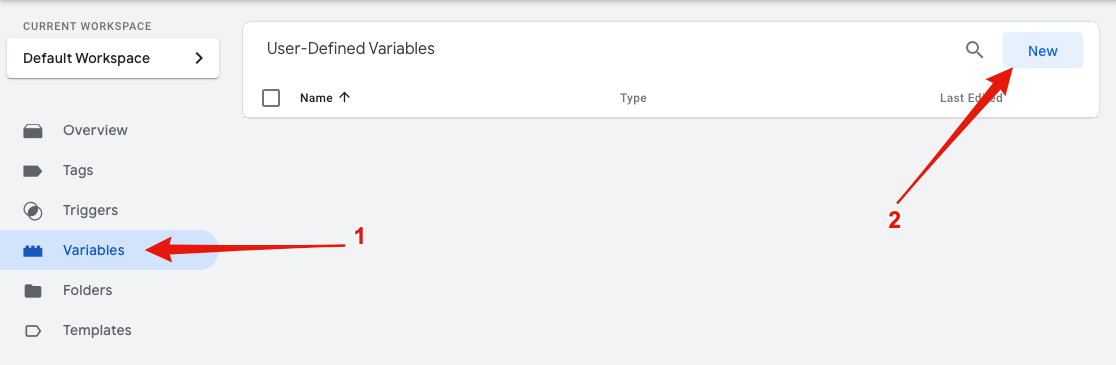
- Scroll down to the User-Defined Variables section and click New.
-
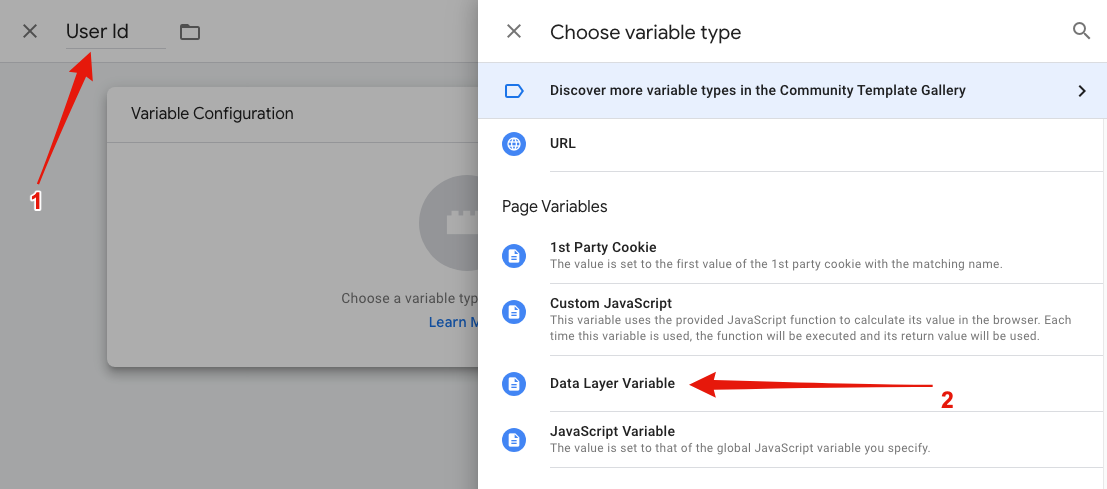
Name your variable (e.g., User ID), and select Data Layer Variable.
-
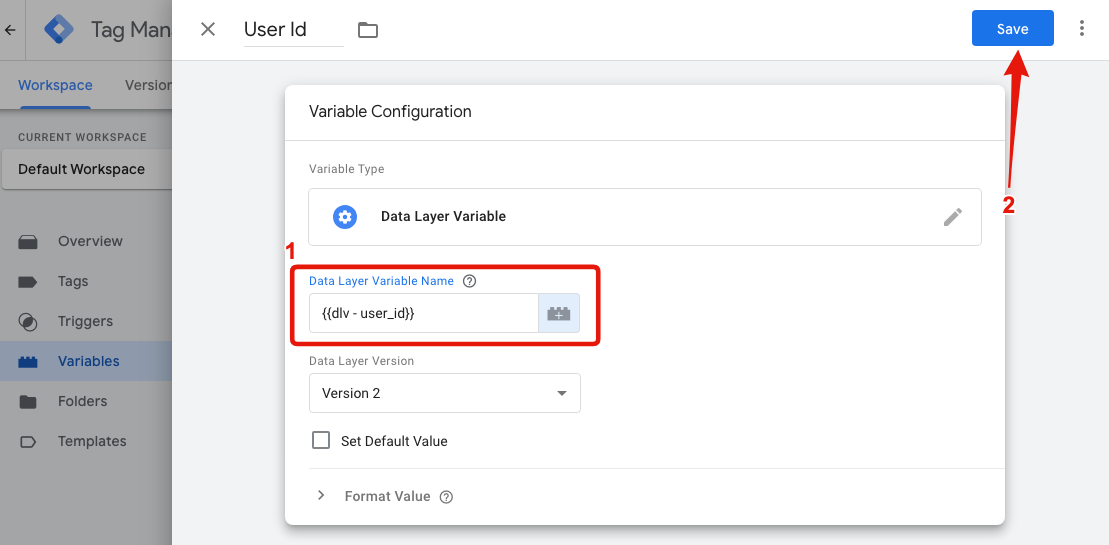
In the Variable Name field, enter {{dlv - user_id}} and click Save.
3.2 Add User ID to GA4 Event Tags Using the Event Settings Variable
The User ID must be sent with every event to Google Analytics 4 when a user is logged in. However, sometimes the User ID might not be available when the GA4 Configuration Tag fires (like during initial page load). To cover this, you should include the user_id in all GA4 Event Tags as a backup.
Instead of manually setting the user_id to every event tag, it's easier to use the Event Settings Variable. Here's how:
- Open your Google Tag Manager workspace.
-
On the lefthand side, click Tags.
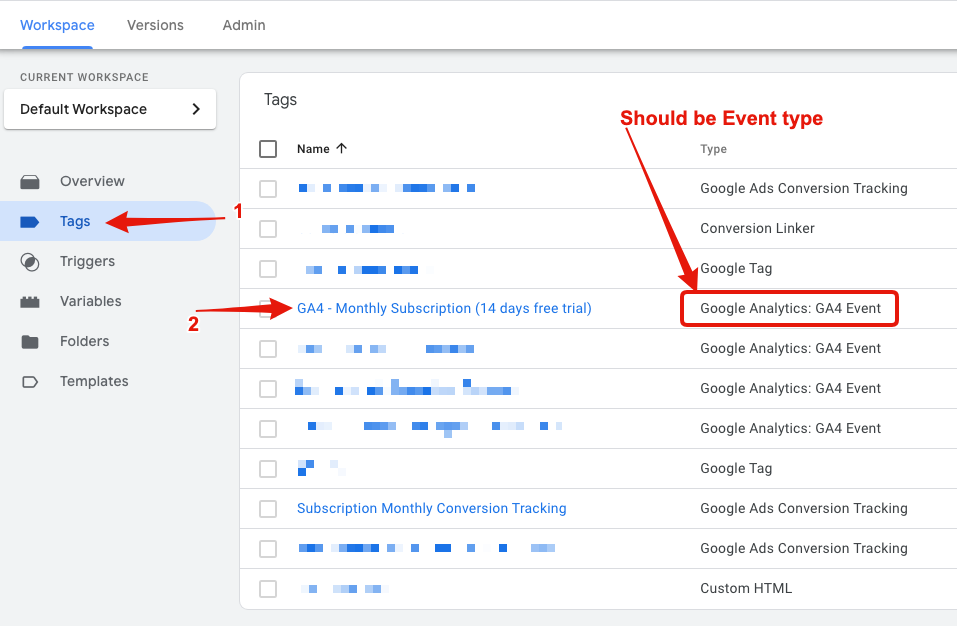
- Update all the Event-type tags.
-
Add user_id parameter to Event and User properties.
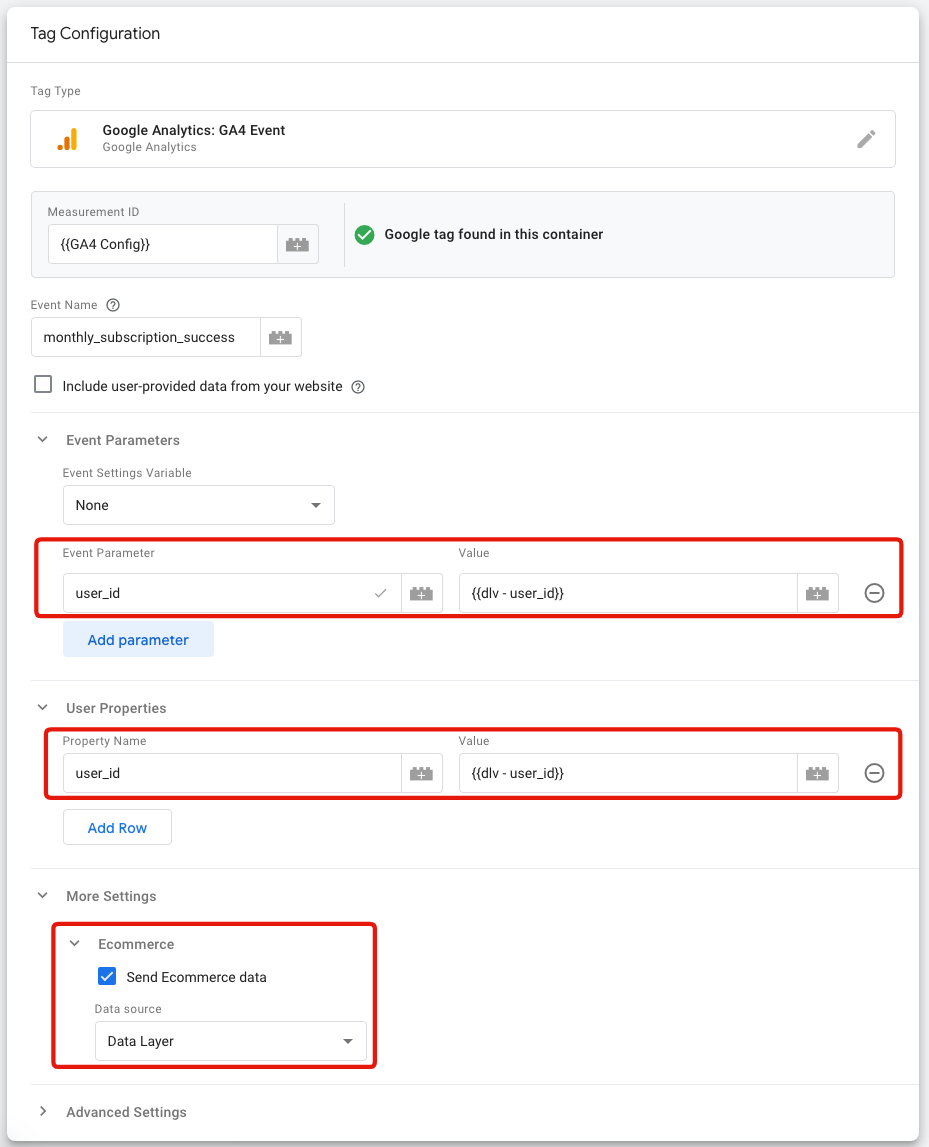
Repeat these steps for every GA4 Event Tag in your container to ensure that the user_id is sent with all events when a user is logged in.
Step 4: Test the Configuration
It’s important to test everything to make sure the User IDs are tracked properly:
- Log in to your website or app using a test user account.
- Perform actions that trigger events (e.g. browsing pages or adding items to a cart).
- Complete a test transaction with Stripe.
-
In GA4, navigate to Configure > DebugView to see incoming events in real-time.
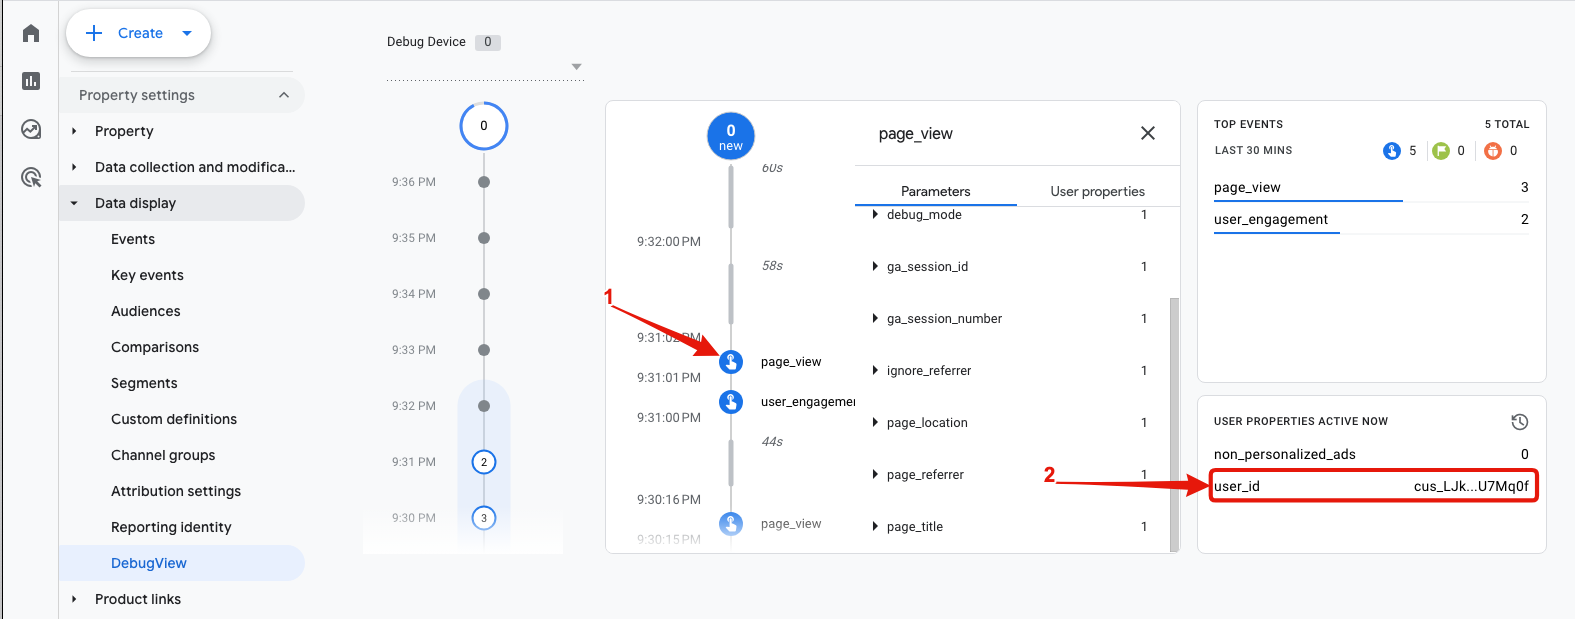
- Make sure each event has the correct user_id attached.
Conclusion
By configuring User ID tracking in Google Analytics 4 and integrating it with Stripe via Paytics, you can unlock powerful insights into your users' behavior and purchasing patterns. This setup empowers you to make data-driven decisions that enhance user experience and drive business growth.
If you have any questions or need assistance, please contact our customer support team at support@paytics.io.


